#  RHEL 설치용 ISO 이미지 파일을 준비

   # usb 마운트 하기 
   # lsblk -f  또는 # fdisk -l  로 파일시스템 및 usb 장착 상태 확인 
   # mount -t vfat /dev/sdb1 /mnt/backup   // dev/sdb1에 있는 usb데이터를 /mnt/backup 디렉토리에 마운트 
   # lsblk -f  또는 # fdisk -l   // 로 확인 
   # /mnt/backup로 이동하여 usb데이터 있는지 확인 
    
 # local repository 만들기 
  1. repo data 원하는 곳으로 copy ( /repo 등으로 이동 - 아래참고)
   # cp -r /mnt/backup/BaseOS/* /repo/BaseOS
   # cp -r /mnt/backup/AppStream/* /repo/AppStream
  2. /etc/yum.repos.d/ 디렉토리에 새로운 .repo 파일을 생성 
   # vi /etc/yum.repos.d/rhel9local.repo
    [BaseOS-local]
    name=RHEL 9 BaseOS Local Repository
    baseurl=file:///repo/BaseOS
    enabled=1
    gpgcheck=0
    [AppStream-local]
    name=RHEL 9 AppStream Local Repository
    baseurl=file:///repo/AppStream
    enabled=1
    gpgcheck=0 
   3. dnf clean all   // 수행 
   4. dnf repolist   // 수행
   5. dnf install nano    // 설치 되는지 TEST 
   - 잘 된다면 설치 완료    
   
 # local repository  삭제 할 경우 
  1. 임시로 비활성화:
    BaseOS-local: sudo yum-config-manager --disable BaseOS-local
    AppStream-local: sudo yum-config-manager --disable AppStream-local
    또는 해당 repo 파일에서 enabled=0로 변경:
    sudo vi /etc/yum.repos.d/rhel9local.repo
각 섹션에 enabled=0로 수정 후 저장
  2. 로컬 리포지터리 제거
   # sudo rm -f /etc/yum.repos.d/rhel9local.repo


# dnf reposync 명령어는 원격의 DNF/YUM 저장소에 있는 패키지들을 로컬 디렉토리에 복사하여 저장하는 데 사용됩니다. 기본적으로 이미 로컬에 존재하는 패키지는 다시 다운로드하지 않으며, 저장소 전체 또는 특정 저장소(repoid로 지정)에서 패키지들을 동기화할 수 있습니다.


1. 명령어 설명

# dnf reposync --download-path=/repo/baseos --repoid=rhel-9-for-x86_64-baseos-rpms --download-metadat


--download-path=/repo/baseos
다운로드된 패키지들이 저장될 로컬 경로를 지정합니다. 여기서는 /repo/baseos 디렉토리에 저장합니다.

--repoid=rhel-9-for-x86_64-baseos-rpms
동기화할 저장소의 ID를 지정합니다. 이 옵션으로 특정 저장소만 선택하여 다운로드합니다.

--download-metadata
저장소의 메타데이터(repo 데이터)를 함께 다운로드합니다. 이 메타데이터를 포함하면 로컬에 있는 패키지 저장소를 바로 다시 DNF가 인식하여 사용할 수 있습니다.


즉 이 명령어는 RHEL 9의 rhel-9-for-x86_64-baseos-rpms 저장소에서 패키지와 메타데이터를 /repo/baseos 경로 아래로 받아 로컬 오프라인 저장소를 구성하는 기능을 합니다


2.   RHEL repository 추가 활성화 하기 ( highavailability-rpms) 
 # subscription-manager repos --enable=rhel-9-for-x86_64-highavailability-rpms
 # subscription-manager repos --enable=rhel-9-for-x86_64-resilientstorage-rpms


3. 동기화할 목록 정보 확인하기 

# subscription-manager repos --list-enabled
+----------------------------------------------------------+
    Available Repositories in /etc/yum.repos.d/redhat.repo
+----------------------------------------------------------+
Repo ID:   rhel-9-for-x86_64-resilientstorage-rpms
Repo Name: Red Hat Enterprise Linux 9 for x86_64 - Resilient Storage (RPMs)
Repo URL:  https://cdn.redhat.com/content/dist/rhel9/$releasever/x86_64/resilientstorage/os
Enabled:   1

Repo ID:   rhel-9-for-x86_64-appstream-rpms
Repo Name: Red Hat Enterprise Linux 9 for x86_64 - AppStream (RPMs)
Repo URL:  https://cdn.redhat.com/content/dist/rhel9/$releasever/x86_64/appstream/os
Enabled:   1

Repo ID:   rhel-9-for-x86_64-highavailability-rpms
Repo Name: Red Hat Enterprise Linux 9 for x86_64 - High Availability (RPMs)
Repo URL:  https://cdn.redhat.com/content/dist/rhel9/$releasever/x86_64/highavailability/os
Enabled:   1

Repo ID:   rhel-9-for-x86_64-baseos-rpms
Repo Name: Red Hat Enterprise Linux 9 for x86_64 - BaseOS (RPMs)
Repo URL:  https://cdn.redhat.com/content/dist/rhel9/$releasever/x86_64/baseos/os
Enabled:   1


 # switchname  [이름]  // 스위치 이름 변경 


 IP 변경방법 
 # show ip interface    // IP 확인 
 # interface mgmt 0   // ip구성모드 진입 
 # ip address [ip주소] [서브넷마스크]   // ip변경 
 # no shutdown    // 활성화 
 # exit  
 # copy running-config startup-config  //구성 저장 


 show running-config
 show zone
 show zoneset
 show interface brief
 show fcs database 
 show fcns database
 show fcns database detail
 show flogi database
 show flogi database interface fc1/1
 show inventory     // 장비 구성품 확인 
 show license usage  // license 


포트 정보 ( >> 는 브로케이드 명령어)
 # show interface fc1/1   >> 브로케이드는 portshow 1/1
 포트 리셋 방법
 # conf t                 >> portdisable 1/1
 # interface fc1/1        >> portenable 1/1 
 # shutdown 
 # no shutdown 
 파워
 # show environment power  >> psshow
 팬 
 # show environment fan    >> fanshow 
 장비 
 # show module             >> chassissshow 
 온도 
 # show environment temperature  >> tempshow 
 버전 
 # show version           >> version 
 스위치정보 
 # show fcs database      >> switchshow 
 켜진시간 
 # show system uptime     >> uptime 
 cfg
 # show zoneset           >> cfgshow 
 # show zone  
 
 ## 조닝 하기 ( port zoning )
 
 0. 상태확인 
 # show interface brief    // switch 포트 연결 상태 확인 

 # conf t    // 구성 모드 집입 

 
 1. 기존 vsan 1이 설정되어 있으며, 추가로 더 설정할 수 있다. 방법은 
 # show vsan usage
 # vsan database     // vsan-db모드로 바뀜
 # vsan 10          // vsan 10 생성 
 # show vsan usage   // vsan 구성 확인 (vsan 1,10으로 보임) 
 # vsan 10 interface fc 1/16   // 스위치1번 16번 포트를 vsan10에 할당 
 # no vsan 10       // vsan 10 삭제 
 
 2. show zoneset 
 - zoneset name ,  zone name 
 # zoneset name SAN2 vsan 1   // 만들거나 접속 
 # zone name FCCVA02_H3_P27_DD6410_H1_P28   // 만들거나 접속 
 # member interface fc 1/27-28   // zone에  포트 할당 
 # zoneset activate name SAN2 vsan 1  // active  수행 
 # show zoneset active  // active 상태 확인  
 # copy running-config startup-config   // 구성을 저장  
 # show flogi database    // 상태 확인 


## firewalld를 비활성화하는 방법

  1. sudo systemctl status firewalld  (상태 확인- 설치가 안되어있으면 could net be found 메시지 발생) 
  2. sudo systemctl stop firewalld (일시적으로 중지)
  3. sudo systemctl disable firewalld (부팅 시 자동 시작 비활성화)
  4. sudo systemctl mask firewalld (다른 서비스가 firewalld를 시작하지 못하도록 영구적으로 막음)

## firewalld를 활성화하는 방법 

   1. sudo systemctl start firewalld (일시적으로 시작)

   2. sudo systemctl enable firewalld  (부팅시 자동 시작 활성화)

   3. sudo systemctl status firewalld  (상태 확인) 


## SELinux  활성화 / 비활성화하는 방법

   1. sestatus 또는 getenforce  (설치 및 상태확인) 

   # getenforce

    - Enforcing : 정책이 적용 

    - Permissive : 정책이 경고만 하고 차단은 하지 않음

    - Disabled : SELinux가 완전히 비활성화된 상태 

   2. SELinux 활성화 / 비활성화 하기 

   # sudo vi /etc/selinux/config   //수행하기 

    - 파일 내용 중에 

     SELINUX=enforcinfg   ->  SELINUX=disabled    //로 수정 후 저장  -> 비활성화 

      SELINUX=disabled    ->  SELINUX=enforcinfg    //로 수정 후 저장  -> 활성화 

   # reboot 수행 후 getenforce 명령어로 disabled 상태 확인  

   3. 일시적 활성화 / 비활성화 

    # sudo setenforce 0     // permissive 상태로 정책이 경고만하고 차단은 안함

    # sudo setenforce 1     //  enforcing 상태로 변경  


* 참고 

Ubuntu/Debian 같은 배포판은 ufw나 iptables를 기본 방화벽으로 사용하므로 firewalld가 설치되어 있지 않을 수 있습니다.

Ubuntu/Debian 같은 배포판은 AppArmor를 기본으로 사용하므로 SELinux가 설치되어 있지 않을 수 있습니다.


1. Secure Boot 상태 확인하기 

 # sudo mokutil --sb-state  

SecureBoot disabled 된 상태


2. 활성화 / 비활성화를 수행 

 # sudo mokutil --disable-validation

 # sudo mokutil --enable-validation

명령 수행 후 password 설정

 그리고 # Reboot 수행


3. MOK 관리화면에서 Secure Boot 활성화 / 비활성화 

 - "Change Secure Boot State" 옵션을 선택하고 Enter 키를 누른다. 

 -  설정한 패스워드의 특정 문자를 입력하라는 메시지가 표시된다. 

 - 요구하는 문자를 정확히 입력하고 Enter

 - No를 선택하여 Secure Boot 비활성화를 확인 

 - Reboot을 선택하여 다시 시작 


4. Secure Boot  활성화 / 비활성화 상태 확인

  # sudo mokutil --sb-state

SecureBoot disabled 된 상태


Windows Server 2022 및 2025 Standard Edition에 IBM Guardium Key Lifecycle Manager 버전 5.0 설치


질문과 답변


질문

IBM Guardium Key Lifecycle Manager 버전 5.0은 Windows Server 2022 및 2025 Standard Edition에서 지원됩니까?

답변

네, Windows Server 2022 및 2025 Standard Edition에 IBM Guardium Key Lifecycle Manager를 설치할 수 있습니다.

IBM Guardium Key Lifecycle Manager를 설치하는 동안 다음과 같은 문제가 발생할 수 있습니다.
 
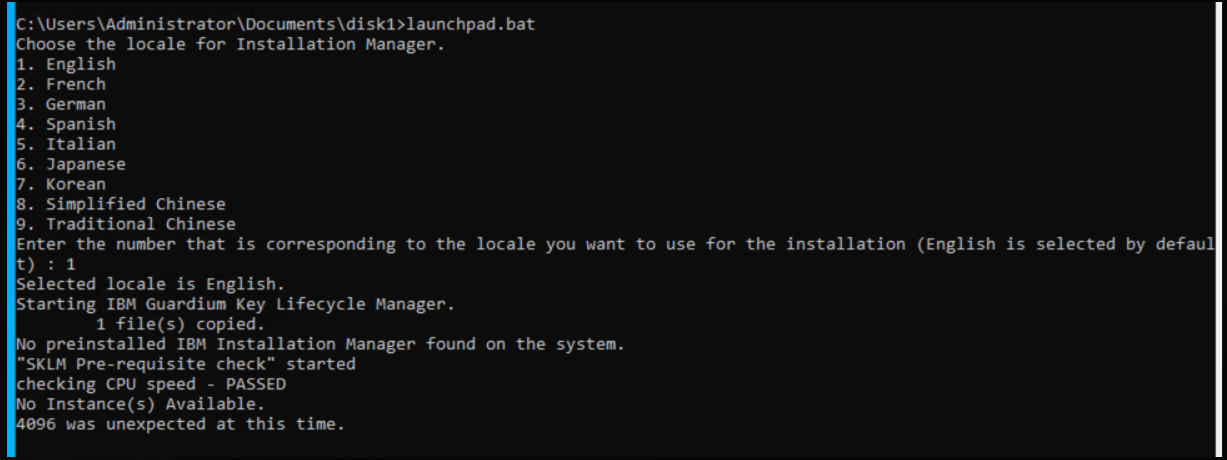
문제 1. Windows Management Instrumentation Command(WMIC) 기능이 없어 설치 과정을 진행할 수 없습니다. 다음과 같은 오류 메시지가 표시될 수 있습니다.


이유: Windows Server 2022 및 2025 Standard Edition에서는 WMIC 기능이 기본적으로 비활성화되어 있습니다.

해결 방법: WMIC 기능을 설치하세요. 다음 단계에 따라 WMIC 기능을 설치하세요.
  1. 시작을 클릭 하거나 키보드나 작업 표시줄에서 Windows 아이콘을 클릭합니다.
  2. 설정 앱을 클릭하세요 .
  3. 시스템 탭을 선택하세요 .
  4. 목록에서 ' 선택적 기능' 옵션을 선택하세요. '선택적 기능' 창에서 WMIC와 같은 주문형 기능(FoD)을 확인, 설치, 제거 및 관리할 수 있습니다. ' 추가된 기능 ' 목록에 WMIC가 표시되지 않도록 하세요.
  5. 선택적 기능 추가 -> 기능 보기를 클릭합니다 .
  6. 추가 기능 추가 창에서 검색 상자에 WMIC를 입력합니다.
  7. WMIC 옆에 있는 확인란을 선택하고 다음을 클릭합니다 .
  8. 추가를 클릭하여 WMIC 기능을 설치합니다.
  9. WMIC 기능이 성공적으로 설치되면  설정 -> 시스템 -> 선택적 기능 -> 추가된 기능 아래에서 WMIC 기능을 볼 수 있습니다 .

문제 2(Windows 2025에만 해당)
Windows 2025에 IBM Guardium Key Lifecycle Manager를 성공적으로 설치한 후에도 버전 정보 REST 서비스를 실행하거나 IBM Guardium Key Lifecycle Manager 홈페이지의 정보 섹션 에서 운영 체제 버전이 여전히 Windows 2022로 표시될 수 있습니다. 하지만 이 문제는 제품의 기능이나 성능에는 영향을 미치지 않습니다.
 
 
- 출처  IBM support - 

'IBM' 카테고리의 다른 글

IBM LTO Device Drivers 설치 방법  (0) 2025.04.22


Eon Browser는 BlackPearl를 사용할 때 쓰는 도구로 데이터의 보관, 복원. 관리하기 위한 프로그램 입니다. 


기본적으로 Windows , linux, mac OS에 설치가 가능합니다. 


1. Spectra BlackPearl Eon Browser downroad site 


https://developer.spectralogic.com/clients/


Existing DS3 (formerly Spectra S3) Clients - Spectra Logic Developer Program

Spectra Logic and its partners have developed numerous DS3 (formerly Spectra S3) clients. The clients listed on this page are available to download and are also free and open source, which means the source code is available and can be used as a reference f

developer.spectralogic.com


2.  설치 방법 및 실행 


 Windows : 설치단계에서 next눌러 진행 후 설치 완료 되면 바로가기 아이콘 생성 , 더블클릭하면 실행됨. 


linux : rpm -ivh로 설치 후에  eonbrowser 명령어를 프로그램 실행 


3. 사용방법 


UserGuide 참고 

BlackPearlEonBrowser-UserGuide.pdf
1.30MB


1.  Rocky Linux ISO  이미지 다운 페이지 


https://rockylinux.org/ko-KR/download


Download - Rocky Linux

다운로드 최신 로키 리눅스 설치 관련 있는 As you download and use Rocky Linux, the Rocky Enterprise Software Foundation invites you to be a part of the community as a contributor. There are many ways to contribute to the project, from docum

rockylinux.org


2. 아카이브 이미지 다운 받을 때 


https://dl.rockylinux.org/vault/rocky/


아카이브 페이지로 넘어가면 일반적으로 ISO 이미지는 원하는 버전으로 가서 isos 디렉토리로 가면 안에 있다. 


https://dl.rockylinux.org/vault/rocky/9.5/isos/x86_64/


Index of /vault/rocky/9.5/isos/x86_64/


dl.rockylinux.org


1. kernel version 확인 

 # uname -r   또는 # uname -a 


2. 패키지 확인 

 # dpkg - l | grep kernel


3. 해당 kernel version이 없다면 다운로드 

 # sudo update 

 # sudo apt install [linux-image-5.15.0-91-generic] [linux-headers-5.15.0-91-generic]  // 원하는 커널 선택

 # sudo apt install linux-image-5.15.0-91-generic linux-headers-5.15.0-91-generic


4. /etc/default/grub 수정

 # vi /etc/default/grub 

 - GRUB_TIME_STYLE=hidden   // 해당 내용에 주석처리 또는 style을 menu로 변경

 - GRUB_TIMEOUT=0   //해당내용에 주석처리 또는 timeout을 원하는 시간으로 변경 

 # update-grub


5. 재부팅 후 부팅 시 커널 선택 

 # sudo reboot 

 - 부팅 직후에 

 -  Advanced options for Ubuntu 선택 

 - 설치된 커널 목록 중 원하는 kernel version 을 선택해서 부팅 


7. 부팅한 kernel을 고정하기 

 # sudo vi /etc/default/grub 

GRUB_DEFAULT='1>Ubuntu, with Linux 5.15.0-91-generic' 값을 수정  

또는 

GRUB_DEFAULT="Advanced options for Ubuntu>Ubuntu, with Linux 5.15.0-91-generic"

// 버전마다 조금 씩 다를 수 있음 


8. grub 업데이트 

 # sudo update-grub 

 # sudo reboot 

 - 재부팅하면 설정한 커널로 자동 부팅


1. ubuntu version /  kernel version 

- 22.04 LTS / 5.15

- 22.04.2 / 5.19

- 22.04.3 / 6.2

- 22.04.4 / 6.5

- 22.04.5 / 6.8


추가.  24.04 LTS ubuntu version / kernel version 

- 24.04 LTS / 6.8 

- 24.04.2 / 6.8


특정 kernel version 설치

1. ubuntu version 확인

# uname -r 또는 uname -a 

kernel 버전 확인

2. 설치할 패키지 확인 

# sudo apt-cache search linux-image

# sudo apt-cache search linux-headers


3. kernel 설치 - 설치하고자 하는 버전을 install 

# sudo apt install linux-image-6.8.0-58-generic

# sudo apt install linux-headers-6.8.0-58-generic

# sudo apt install linux-image-generic-hwe-22.04


4. 패키지 확인

# dpkg -l | grep linux-image*

# dpkg -l | grep linux-header*

package 확인


5. reboot 

 - rebooting 완료 후 최신 커널로 적용 


6. 적용 확인 

# uname -r


7. 기존 커널이 필요 없다면 삭제 

# sudo apt autoremove 


kernel version hold 방법

1.  현재 kernel version 확인 

# uname -r 

# dpkg -l | grep linux-image*

# dpkg -l | grep linux-header*


2.  apt-mark hold 명령어로 패키지 홀드 

# sudo apt-mark hold linux-image-6.8.0-58-generic
# sudo apt-mark hold linux-headers-6.8.0-58-generic

# sudo apt-mark hold linux-image-generic-hwe-22.04

kernel version hold

3. kernel version hold 확인 

# sudo apt-mark showhold

hold 확인


4. hold 해제할 경우 

아래와 같이 unhold 사용하여 해제 

 # sudo apt-mark unhold linux-image-6.8.0-58-generic


+ Recent posts